


In this article I would like to write about testing in Go
Introduction to Testing
One of the first question should be, how to test in Go? What do we need to install, which libraries, modules?
Fortunately with Go, simplicity is one of the core guilding principles. So when it comes to testing in Go, you are presented with full-feature set of testing and profiling tools. So as soon as you install the Go compiler you are also going to get testing and profiling tools associating with that. This means, you dont need to install third party libraries, but if you want to, you can. However all of the basics for creating your own tests and profiling your applications are included right when you install the Go basic tools. We are also going to be presented with API for controlling test execution.
There is a testing package included in the standard library and its gonna include everything to start writing your own tests, and control how those tests run. Little support for assertions. Most of the tests can be determined with if statements.
If you want an assertion framework, there is nothing wrong with that, but when you want to determine whether a test passes or fails, you do not need assertions. Now one question you may ask from yourself is what type of tests can you write with Go?
There are in fact three tests
- Basic test - Unit, Integration, End to End
- Benchmark test - Performance profiling -> efficiency
- Example test - Documentation
Creating and running Tests
Simple test examples
package main_test

import "testing"

func TestAddition(t *testing.T) {
    got := 2 + 2
    expected := 4
    if got != expected {
    t.Errorf("Did not get expected result. Got: '%v' , wanted: '%v'", got, expected)
    }
}

func TestSubtraction(t *testing.T) {
    got := 10 - 4
    expected := 6
    if got != expected {
    t.Errorf("Did not get expected result. Got: '%v', wanted: '%v' ", got, expected)
    }
}
After you run go test in the command line, the terminal would appear like this, as expected
PASS
ok      gotesting       0.242s
As you can se above, we used the testing package from Go. However not this is the only package for testing that Go provides. There are four packages I would like to mention:
- "testing"
- "testing/quick"
- "testing/iotest"
- "net/http/httptest"
Naming conventions in go
In some languages we have the flexibility about the naming convention that we adopt. We dont have that much flexibility in Go because those conventions helps other engineers identify your tests, and they are also used by the tooling to identify where your test suite is at and what tests are contained within that test suite.
Example of naming conventions in Go
main_test.go -> Add _test to filenames package main -> Prefix tests with "Test"
func TestFoo(t testing.T) { -> Accepts one parameter : testing.T .... }
Now lets test two functions package messages
import "fmt"

func Greet(name string) string {
    return fmt.Sprintf("Hello, %v\n",name)
}

func depart (name string) string {
    return fmt.Sprintf("Goodbye, %v\n",name)
}
How should we test these functions ? What kind of failure methods we have available for us ?
- Immediate failure - exit the test immediately
- Non-immediate failure - is indicationg that a failure occured, but your test function is going to continue executing.
Immediate failures
- t.FailNow() - one argument
- t.Fatal(args ...interface{}) - series of arguments and those are going to contain strings and other log messages
- t.Fatalf(format strings, args ...interface{}) - we can format the string in the output that we are going to write out to the terminal with a little bit more control than we have in other two methods
Non-immediate failure
- t.Fail()
- t.Error(args ...interface{})
- t.Errorf(format string, args ...interface{})
So now lets finish the tests
package main

import "testing"

func TestGreet(t *testing.T) {
    got := Greet("Gopher")
    expect := "Hello, Gopher\n"

    if got != expect {
        t.Errorf("Did not get expected result. Wanted %v, got: %v\n",expect, &got)
    }
}

func TestDepart(t *testing.T) {
    got := depart("Gopher")
    expect := "Goodbye, Gopher\n"

    if got != expect {
        t.Errorf("Did not get expected result. Wanted %v, got: %v\n",expect, &got)
    }
}
Now we have the test cases ready. So let's talk about how to run them.
The most important command you have to be aware of is go test command - it is going to discover and execute all of the tests in the current directory. go test {pkg1} {pkg2} - test specified packages go test -v - Generate verbose output go test -run {regexp} - run only tests with matching {regexp}
Once you run the go test you can see the following lines appear in terminal

Test reports in go
Generating test reports is very straightforward in Go. To use it you can simply say go test -cover and you can see the code coverage

If you run this command for these functions and tests you can see 100% appears. However you can export the results of the text coverage using the
go test -coverprofile cover.out command
after this you can use
go tool cover -func cover.out
But there is something really straightforward that I have not seen earlier, built in already in a language. You have to first call
o test -coverprofile cover.out
and then
go tool cover -html cover.out
and you can see an HTML appears with the content
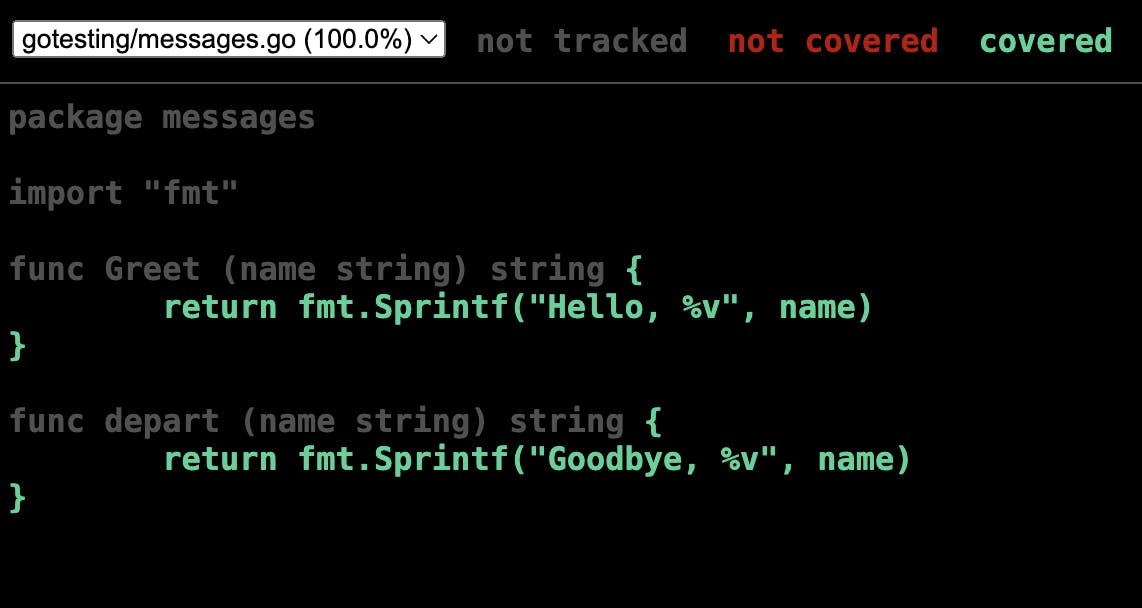
There is one more I would like to mention. Once you run
go test -coverprofile count.out -covermode count
and then
go tool cover -html count.out
The following html appears
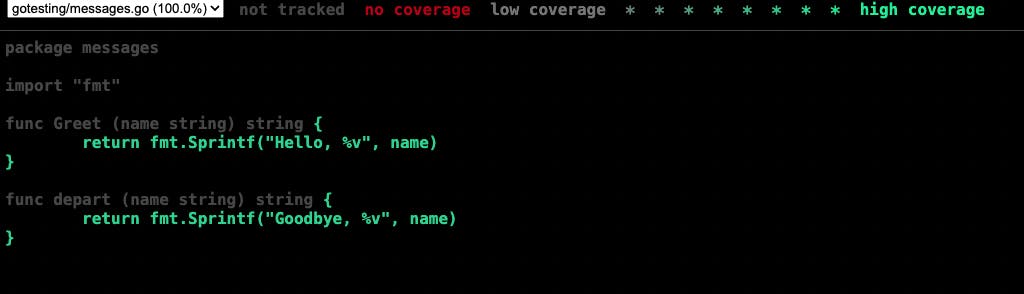
and now you can see that the scale of the top changed. Instead of covered or not we can see low coverage to high coverage
There are also some other useful functions that you may want to use, they worth a research 😜
- Log and Logf - if you want to indicate a message but dont want to indicate it as a failure
- Helper - if you have got a test method and you want to flag to the test runner that it is in fact a helper method
- Skip, Skipf, SkipNow - allows you to skip one or more tests in your test suite (Skip for string, Skipf for formatted string, SkipNow does not take any arguments, but it simply allows you to skip that test.
- Run - allows you to create subtests within one test function (take a callback function that takes a description and a callback function that accepts another testing.T object - to run own subtest suites. This is good for APIs and to test differrent aspects of those APIs.
- Parallel - normally tests runs sequentally. Well there can be situations when the functions after each other, do not depend on each other. So in this cases you can run the tests parallel
Benchmarking and Profiling
Benchmark tests and regular tests can live together in the same file. However there is something you can recognise. Instead of the Test prefix we use Benchmark prefix.
func BenchMarkFoo (b *testing.B){ ....
The first and most important member to be aware of is the N field. N is going to indicate the number of times that we want our benchmark tests to run. So what is going to happen whenwe run our benchmark tests is the Go test runner is going to run a couple of sample runs of the tests thatwe want to benchmark. Then it is going to alter the number N that is passes in with that b object to increment it until it hits the amount of time that we want our benchmark to test. So you can specify that you want your benchmarking last to 1 second 100 secs or 1000secs Some other members that are important to be aware of are the
- b.StartTimer()
- b.StopTimer()
- b.ResetTimer() What can be these good for? So for example if you want to do end-to-end performance check, you do not really want to measure the time of your database connection, because that is going to be done during application startup. Using these methods you actually have fine-grained control over what exactly is being benchmarked during your tests. The last method I would like to mention is the
- b.RunParallel() the RunParallel() takes a function and what is gonna do is whatever function you pass in it is going to actually parallelize that. So it is going to send multiple versions of that function into the test runner. This is a good way to make tests that are going to stress the resources of the system that you application is running on.
Writing a benchmark test
package gotesting

import (
    "crypto/sha1"
    "testing"
)

func BenchmarkSHA1 (b *testing.B){
    data := []byte("Mary had a little lamb")
    b.StartTimer()
    for i := 0 ; i < b.N ; i++ {
        sha1.Sum(data)
    }

}
So as you can see the only difference between benchmark and unit tests is in this case we have to use the Benchmark prefix, we accept a different object, we accept a pointer to a testing.B object instead of that testing.T object and inside the benchmark test we have a loop that is going from 0 to b.N and that is going to allow the test runner to alter how many iterations of this test get run so that it can not get a really nice benchmark established for us.
Run benchmark tests
The first thing to be aware of is we are still going to use the go test command However, by default, go test is not going to run your benchmarking tests, because benchmarking tests typically take quite a bit longer than unit tests, we need to specifically call out that we want those tests to be run. We will use
go test -bench
We also have the possibility to define how long we want our benchmarking tests to last. We wrote about a little while ago how can we specify the amount of time we want a benchmark to take and then that N variable is going to be varied in order to hit that time. Well, to provide that time information we are going to pass in the benchtime flag as you see here.
go test -bench -benchtime 10s
If in a single file you have multiple benchmark tests, you can simply run them all using the go test -bench . command After running you will see a message like this

The number 24015504 means that SHA1 took a little over 24 mllion iterations to run in order to hit my benchmarking time which is by default 1s. And then in the right column you see the amount of time that it took per test. Now by default benchtime is 1s but we can change that, using the go test -bench . -benchtime 10s
This is very useful if you want to do high duration tests or if what you testing is a really long test.
Profiling tests
The first and perhaps simplest type of profiling information to gather is using the -benchmem flag
go test -benchmem
what this is going to do is, in addition to reporting wether our tests pass or fail and the amount of time that it takes to run our tests it is also going to report out of the memory allocation statistics. So for example, how much memory was allocated, how many allocation operations happened during the course of the test. We also have the ability to generate tracing information by passing in the -trace flag and then passing in the file name that we want the trace written out to. You can compare this with the trace tool to analyze the execution traces of your tests and the application that is being tested.
go test -trace {trace.out}
And then finally, we have go test type and then insert type here, profile.
go test -{trace}profile {file}
What type of profiles are available?
- block
- cover
- cpu
- mem
- mutex
To demo this in this article we have to make a new function that allocates memory (the original SHA algorithm is optimized so it does not allocate memory). For this use the following code snippet
package messages

import (
    "crypto/sha1"
    "testing"
)

func BenchmarkSHA1 (b *testing.B){
    data := []byte("Mary had a little lamb")
    b.StartTimer()
    for i := 0 ; i < b.N ; i++ {
        sha1.Sum(data)
    }
}

func BenchmarkSHA1Alloc (b *testing.B){
    data := []byte("Mary had a little lamb")
    b.StartTimer()
    for i := 0 ; i < b.N ; i++ {
        h := sha1.New()
        h.Sum(data)
    }
}
Then run
go test -bench . -benchmem
and now check the picture below

In the picture you can see that the new function allocated memory and that our performance is dropped from 47ns to 60ns which is in percentage a big amount. Furthermore Go offers many ways to tests profiling. You can even export an svg like below

To make this svg you need to have graphviz installed! To continue, you must have on on your computer! You can dowload it here: https://graphviz.org/
Now lets see how can we do this first use the command
go test -bench Alloc -memprofile profile.out
then
go tool pprof profile.out
and then write
svg
Thank you for reading the article, keep up reading 😋